Dwi Wahyudi
Senior Software Engineer (Ruby, Golang, Java)
In this article we’re going to look at Kubernetes, the de-facto standard tool for orchestrating application containers. Kubernetes is free and open-source software developed by Cloud Native Computing Foundation (CNCF). Kubernetes is easy to set-up and use and gives us a lots of nice features for us to run day to day of application containers operations and deployments, and it can be used with many containerization tools like Docker, Podman, etc. In this particular article we’re going to discuss Kubernetes usage with Docker.
Kubernetes is really known for its open-source license, aside from that it has features that can help us build robust and documentable software projects. Some of the features that are well known:
- Easy integration with containerization tools like Docker and Podman (better reuse too), which means Kubernetes is built to manage a lots of application containers at once. We previously covered the basic of Docker in this article.
- It has a concept of service for grouping pods and network it communicates by using selector, etc.
- Auto-heal / self-heal, if any pod (a group/collection of containers) crashes, Kubernetes will try to restart it.
- Auto-rollback / rollout, with Kubernetes, we can set certain criteria to do (or experiment) plenty of deployment schemes, from canary deployment to blue green deployment.
- Auto-scalable, with certain criteria, we can set Kubernetes to increase or reduce number of pods running at a time. For example, we can tell Kubernetes to automatically add more pods (run more containers) if let say all of the currently running pods are in high resource usages, when the resource usages are back to low Kubernetes can automatically reduce it back to previous number again. With this concept in mind, we want better resource efficiency when deploying software projects.
- Better isolation, in some context Kubernetes can give us better security and isolation, because if some parts of applications can only be accessed by internal applications we can just tell them to communicate locally without exposing the private api to public. When we need to expose them to public, we do so by creating a new service.
The basic usage of Kubernetes is like this: Each pod has their own internal IP address, and its presence are not forever, it can crash, it can be terminated, the service and deployment are the things that are static (and preferrably documented). We group pods into deployments, and we expose them (to public) with services.
Let say we want to create a service of e-commerce, inside it there are product and user_identity applications that we develop, 2 different docker images from 2 different codebases, we specify a deployment named e-commerce, inside that deployment we specify the replicas/pods number, for example 5 for product app and 2 for user_identity app, let the Kubernetes service do load-balancing between those pods, each container can has its own internal port, in order for them to be accessed from outside, we create a service and map the ports of those 2 applications. Those replicas/pods might crash, but the deployment and service remain. Kubernetes will try to fill-in the needed replicas/pods number, and we can specify some criteria like: if CPU usage is more than 70%, deploy 1 more replica/pod. Both product and user_identity applications can communicate internally, we only expose endpoints that need to be exposed to public.
Kubernetes website gives more list of its features: https://kubernetes.io/
Installing kubectl and minikube
We can refer to this page for installing kubectl in our machine: https://kubernetes.io/docs/tasks/tools/
We’re required to install kubectl binary,
- make sure the sha checksum is ok,
- make sure the binary executable (
$ chmod +x ./kubectlfor mac and linux users), - and version command correctly return the version information.
Note that kubectl is just command line tool for interacting with Kubernetes server. That’s right, Kubernetes has its own server, the master server (or control plane) which controls the worker nodes (nodes that contain our applications).
For local cluster in our machine (for development/learning purpose), we can just use minikube (https://minikube.sigs.k8s.io/docs/start/).
In production however, there are several ways to deploy production-grade Kubernetes server, we can use kubespray or kops.
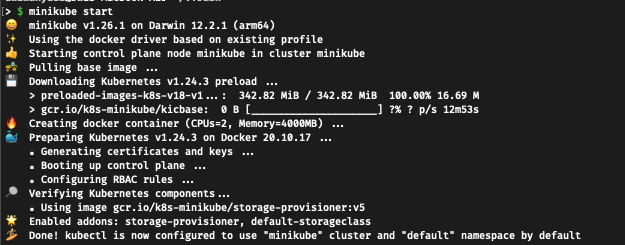
After installing minikube, we can start it with $ minikube start. Note that in order to run this, we need Docker installed first, because minikube will be deployed and run as a Docker container. Docker is the containerization driver that is by default supported and selected by minikube. Installing Docker can be done by referring to this documentation: https://docs.docker.com/get-docker/
When we start the minikube for the first time, it’ll be installing the Kubernetes server for us.
Wait until it’s completed.
We can validate if we can contact the control-plane via kubectl using $ kubectl cluster-info:

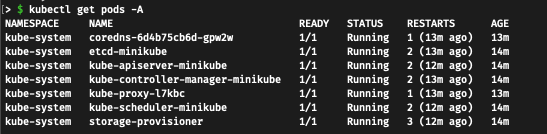
By default, it creates some pods with namespace kube-system, this pods are necessary for control plane activities. We can check them using $ kubectl get pods -A
Sample Application Deployment
With kubectl in our hand connecting with a running Kubernetes server, we can now create a sample deployment.
$ kubectl create deployment sample-web --image=gcr.io/google-samples/hello-app:1.0
kubectl will call the Kubernetes server to create a new deployment using a Docker image google-samples/hello-app:1.0.
When we check again the pods with kubectl get pods -A, we’re going to get a new pod:
NAMESPACE              NAME                                         READY   STATUS         RESTARTS      AGE
default                sample-web-5786854887-vb9q4                  1/1     Running        0             27s
This pod is there but it’s not exposed yet. Let’s expose it:
$ kubectl expose deployment sample-web --type=NodePort --port=8080
Now we can check the services list and find our sample-web service:
$ kubectl get services -A

As described above, a service is a group or collection of pods that is exposed as a network service. ClusterIP type service is only reachable from inside the cluster (not exposed), while NodePort type service is reachable by external (exposed to our local host machine). hello-app application expose 8000 from its dockerfile, minikube map the port to 30494, but this is inside the Docker’s minikube container. We cannot access it with http://127.0.0.1:30949.
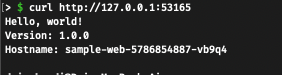
With minikube let’s tunnel into the service. With minikube service sample-web --url we can get the url which tunnels to the minikube container of port 30949. For example, the output will be like:
http://127.0.0.1:53165
We can then access it from our local machine.
In the next article we’re going to discuss deploying projects with Kubernetes, but using a manifest file.